Showing posts with label DIY. Show all posts

Feature + DIY Group Projects 1 and 2

    | 27 comments
Hey guys! I've been featured by Marie Young from the awesome Good Lookn Out blog. Head on over and check it out. Thanks!

6 Personal Style Tips From A DIY Personal Style Blogger, Tomboy Edition #whosthatgirlmo


Now back to the regularly scheduled program..

diy group projects 1 and 2 {who is that girl mo?}
I volunteer at a women's residential treatment center once a month teaching an arts and crafts class. I began last month and the ladies made graphic tees. This month this ladies made rings, earrings, bracelets and necklaces. This is always a fun time and I thought it would be cool to share a little something about what I do outside of blogging. There are currently 6 women participating in the class.

DIY: Gold Loafers

    | 43 comments
gold loafers pose 1 {who is that girl mo?}
I haven't been wearing my silver glitter loafers so I decided to refashion it into something more wearable. I decided on yellow gold since there were quite a few pairs of metallic gold shoes that I've had my eyes on but wasn't willing to spend the money on. Now I have a new pair of shoes all for under $5.

DIY: Another Striped Pencil Skirt

    | 38 comments
Striped pencil skirt day and night {who is that girl mo?}
I decided to make yet another pencil skirt but with vertical stripes this time. I used a black and white stretch fabric with wide stripes. This is the 4th pencil skirt that I have made and I love how versatile it is so here's a day to night look on how I'd style this skirt.

DIY: Bleached Denim Jacket

    | 34 comments
DIY bleached denim jacket pose 1 {who is that girl mo?}

This week's DIY project is a bleached denim jacket. The weather has been so nice lately that it feels like Spring so I decided to spruce up a denim jacket that I thrifted a few weeks ago. I love the fit but I wasn't too keen on the wash. It reminded me of old school mom jeans. :-) My initial idea was to bleach about half of the sleeves but then I decided that I wanted my jacket to have more of a grungy look. I created some holes to the sleeves to complete the look.

DIY: Lace Back Tunic

    | 19 comments
DIY lace back tunic pose 1 {who is that girl Mo?}
For this week's DIY project I decided to go through my stash and sew something from scratch. I haven't sewn anything from a pattern since I got my first sewing machine about 4 years ago. I feel like I'm horrible at pattern sewing and better at refashioning items. I always have trouble getting the sizing right but we all know that practice makes perfect and my goal is to sew something from scratch at least once a month. The first piece is a lace back tunic and I used a pattern fabric and black lace as the contrast for the top back. The fabric has been in my stash since I bought last summer when I attended the MimiGStyle conference. I used version C from the pattern. 
Supplies:
fabric 
pattern McCalls M6359
bias tape
pins
scissors
sewing machine
DIY lace back tunic tutorial pics {who is that girl Mo?}
DIY lace back tunic front and back view {who is that girl Mo?}
DIY lace back tunic pose 2 {who is that girl Mo?}

DIY lace back tunic pose 3 {who is that girl Mo?}

DIY lace back tunic pose 4 {who is that girl Mo?}

DIY lace back tunic pose 5 {who is that girl Mo?}

Outfit Details:
boots Crown Vintage | thrifted pants J Crew | hat H&M
Linking up with: THE STYLE RECORD | WHITNEY NIC JAMES | MONDAY MINGLE | Monday Bloom | FUNDAY MONDAY | Mix It Mondays | DO TELL TUESDAY

DIY: Oversized Bow Tie

    | 44 comments
DIY oversized bowtie pose 1 {who is that girl mo?}
This week's DIY project is an accessory. I decided to make an oversized bowtie or pussy bow. 
Supplies:
fabric
pins
scissors
sewing machine
ruler
chalk
  • Using the ruler and chalk, cut 3 pieces of fabric; 10x40 (tie), 3x5 (middle bow), and 8x14 (main bow)
  • Interfacing can be applied to the main bow to have a stiffer look. I decided I wanted mine to hang more like a pussy bow. Fold each fabric in half right sides facing each other.
  • Sew a seam on the long side of both the middle and main bows.
  • Turn inside out and iron flat.
  • Fold in half and sew a seam on the short side of the bows. This will create a tube or circle.
  • Slide the main bow through the middle bow and adjust.
  • Take the fabric tie which should be folded in half and measure 2 inches from the raw edge. Draw a diagonal line from this point and cut at angle. This will make the ends of the tie pointy instead of straight.
  • Sew around the tie leaving an 1 inch gap or opening.
  • Pull tie inside out and sew the opening closed.
  • Iron flat.
  • Pull one end of the tie through the back of the middle bow and repeat for the other end.
DIY oversized bowtie tutorial pics {who is that girl mo?}

DIY oversized bowtie pose 2 {who is that girl mo?}

DIY oversized bowtie pose 3 {who is that girl mo?}

DIY oversized bowtie pose 4 {who is that girl mo?}

DIY oversized bowtie pose 6 {who is that girl mo?}


Are you into wearing bowties or do you think it's something for the boys?

Outfit Details:
shirt NY&Co | thrifted jeans Seven for all Mankind | jacket H&M | oxfords Miz Mooz


The Style Record | Whitney Nic James | Monday Mingle | Funday Monday | Do Tell Tuesday

DIY: Graphic Tee

    | 47 comments
DIY graphic tee pose 1 {who is that girl mo?}
This week's DIY project is simple and fun. I decided to keep it easy so I can wear a casual look.
Supplies:
t-shirt
fabric paint
bowl
painter's tape
foam brush
cardboard or magazines
  • After coming up with a design, Apply the painter's tape to the shirt on the areas that you don't want painted.
  • Place the cardboard or magazine in between the shirt so the paint will not bleed through.
  • Pour paint into bowl.
  • Begin applying the paint in the desired areas.
  • Let dry overnight.
  • Carefully remove painter's tape from shirt.
DIY graphic tee tutorial pics {who is that girl mo?}
DIY graphic tee pose 2 {who is that girl mo?}

military jacket skinny jeans combat boots {who is that girl mo?}

DIY graphic tee pose 3 {who is that girl mo?}

DIY graphic tee pose 4 {who is that girl mo?}


Are you into graphic tees?

Outfit Details:
thrifted jeans BDG | boots MIA | jacket Old Navy

Linking up with: The Style Record |  Monday Mingle | Funday Monday
 Monday Bloom | Mix it Mondays | Do Tell Tuesdays | All Things Pretty

DIY: Shirtdress

    | 28 comments

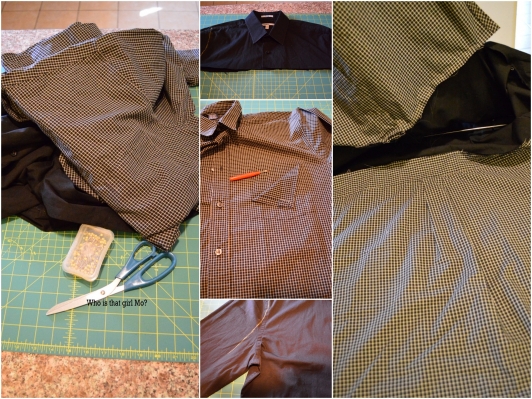
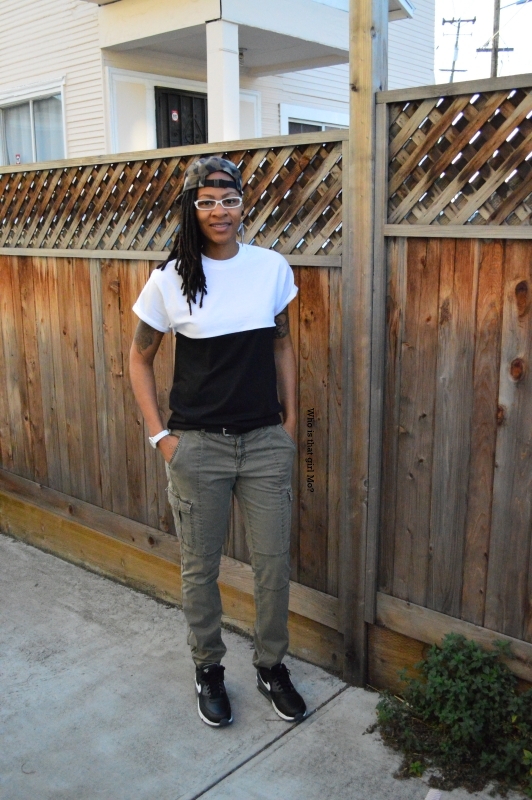
I'm back with another DIY and this week I made a shirt dress from 2 men's button up shirts. By using two shirts I was able to make the dress color blocked. It's best to use shirts that are much larger than you. I used a large for the top half and an extra large for the bottom half. I ended up not having enough for the dress to wrap completely around me, so I used leftover scraps and created side panels. Next time I will use a 2xl button up.


I'm not really big on dresses but I like this style and it was cool to make. Are you big on dresses?


Linking up with: Whitney Nic James | The Style Record | Monday Bloom | Monday Mingle  
Funday Monday | Two Birds | A La Mode Monday | Do Tell Tuesday | Style Elixir
All Things Pretty

DIY: Color Blocked Shirts

    | 39 comments
This week I'm giving you not 1 but 3 different ways to make a colorblock top. The project can be done using 2 or more colors and you can totally choose where you want each color block piece to go and how big or wide you would like it to be. You can use old t-shirts or shirts that you have lying around the house or even new shirts that you just want to make some pretty changes to. It's best to use shirts of the same size and material to help make things go easier and smoother.
Supplies:
t-shirts/shirts
scissors
ruler
pins
chalk
sewing machine/serger
  • Mark on each shirt where you want each block to be place using the chalk and ruler and cut.
  • place each piece right sides facing each other making sure one piece is inside of the other piece. 
  • Pin around the edges to hold in place.
  • Sew using a straight stitch and then repeat using a zig zag stitch. You can also use a serger.
  • Iron the seams 

All black with a pop of neon
I made this shirt a little longer so it can be worn as a tunic with leggings. I used two t-shirts.


Diagonally cute
I made this shirt using two henleys. I thought I'd challenge myself but make sure you use shirts with nothing on it.


Tomboy Swag
For this shirt, I used black and white t-shirts. You can never go wrong with this classic color trend.


What do you guys think about this project? Which look is your favorite?

Happy MLK Jr. Day!!!


DIY: Tie Dye Jeans

    | 29 comments

This week's DIY project is Tie Dye Jeans. I know tie dye articles of clothing are usually worn in summer months but who cares about the rules. Besides, I'm in Cali which mean there are usually more warm days than not. At least during the day. For those of you who may recall my acid wash jeans project, it may seem like it's similar to this project but I promise the results are different. I'm going to do this project again with colored dye using my white jeans to wear during the upcoming Spring months.
Supplies:
jeans
rubber bands
bleach
bucket
gloves
 
  • Soak the jeans in cold water and ring out.
  • Tie the rubber bands around the jeans in bunches until it is tied into a ball. There is no right or wrong way to do this. The areas with the bands is where the darker patches will be.
  • Mix 1 part bleach and 2 parts water in the bucket. With gloves, place the jeans into the bucket.
  • Let sit for a few hours or so and keep checking until desired results are achieved. I let mine sit for 3 hours. More time = more white/lighter patches.
  • Remove the jeans with the gloves and rinse in sink or tub with cold water.
  • Air dry. I let mine dry overnight.
  • Machine wash alone with soap and then machine dry.


What do you think about tie dye jeans? What color dyes should I use for my Spring pair?
 
Outfit Details:
thrifted jeans H&M | blazer H&M | shirt Target | thrifted men's boots


Linking up with: Funday Monday | Monday Mingle | The Style Record | Two Birds 
Do Tell Tuesday | All Things Pretty | Treat Yo Self

Favorite DIYS of 2013

    | 16 comments


Although I love every DIY that I have done, I made a collage of my favorites this year. Sharing them all would have made this a photo heavy post.


cut out shoulder top | patchwork denim | lattice style shirt | maxi dress  
leather hoodie | tartan sleeved blazer | striped pencil skirt | embellished sweatshirt
blazer vest | lace back blazer
Which DIYs were your favorites? Are there any that you liked that didn't make the cut?

Linking up with Do Tell Tuesdays | The Sewcialite