Showing posts with label HM. Show all posts

DIY: Lace Back Tunic

    | 19 comments
DIY lace back tunic pose 1 {who is that girl Mo?}
For this week's DIY project I decided to go through my stash and sew something from scratch. I haven't sewn anything from a pattern since I got my first sewing machine about 4 years ago. I feel like I'm horrible at pattern sewing and better at refashioning items. I always have trouble getting the sizing right but we all know that practice makes perfect and my goal is to sew something from scratch at least once a month. The first piece is a lace back tunic and I used a pattern fabric and black lace as the contrast for the top back. The fabric has been in my stash since I bought last summer when I attended the MimiGStyle conference. I used version C from the pattern. 
Supplies:
fabric 
pattern McCalls M6359
bias tape
pins
scissors
sewing machine
DIY lace back tunic tutorial pics {who is that girl Mo?}
DIY lace back tunic front and back view {who is that girl Mo?}
DIY lace back tunic pose 2 {who is that girl Mo?}

DIY lace back tunic pose 3 {who is that girl Mo?}

DIY lace back tunic pose 4 {who is that girl Mo?}

DIY lace back tunic pose 5 {who is that girl Mo?}

Outfit Details:
boots Crown Vintage | thrifted pants J Crew | hat H&M
Linking up with: THE STYLE RECORD | WHITNEY NIC JAMES | MONDAY MINGLE | Monday Bloom FUNDAY MONDAY | Mix It MondaysDO TELL TUESDAY

Outfit Crush: Winter Sweater

    | 22 comments


I came across this cute layered look on Style Caster last week and it shared 50 winter outfits to copy right now. There were quite a few that I saved to my inspiration list and this is one of my favs. It is worn by blogger Irena from A Portable Package who's also a dentist by day. Pretty cool, huh? She has a really nice style with looks that most of us would love to copy and make our own.

Source


Get This Look!
winter layers
Outfit Details:
men's sweater Old Navy | men's button up Target | skinny jeans Gap | boots Dolce Vita | bag H&M | necklace Forever21


Linking up with: Get Your Pretty On | Because Shanna Said So | Pleated Poppy 
Style Elixir | Treasure Tromp | All Things Thursday

Blog A Lot

    | 45 comments


Tomorrow is my 1 year blogiversary!! Man, how time flies. I want to dedicate this post to everyone who takes the time to visit my blog, read my posts, leave me a much appreciated comment, and for everyone who motivates me to want to continue blogging for a very long time. Today marks post number 175! That's quite a bit of blogging and style posts and it's safe to say that I blog A LOT. My style has changed and evolved tremendously over this past year and I've learned that it's easier and cheaper to just stick to being yourself. :-) Oh yeah, How cool is this tee!?!
Thanks so much guys!!!!

Outfit Details:
jacket H&M | thrifted jeans JCrew | sneakers Converse | button up Target | tee Raygun

Linking up with: Simple Easy Style | Style Elixir

DIY: Blinging Beanie

    | 24 comments

Supplies:
beanie
buttons with bling
needle and thread or medium safety pins


  • Decide where you want to place the buttons. You can use 1, 2 or more buttons.
  • Hand stitch into place with needle and thread or secure buttons with safety pins if you want it to be interchangeable between different color beanies. (As you can see, I switched the buttons to my red beanie.)


Outfit Details:
thrifted turtleneck H&M | men's cardigan Target | DIY acid washed jeans | boots Dolce Vita | beanie Target


Linking up with: Monday Mingle | The Style Record | Monday Funday | Monday Bloom  | Two Birds

DIY: Sequin Trim Blazer

    | 31 comments
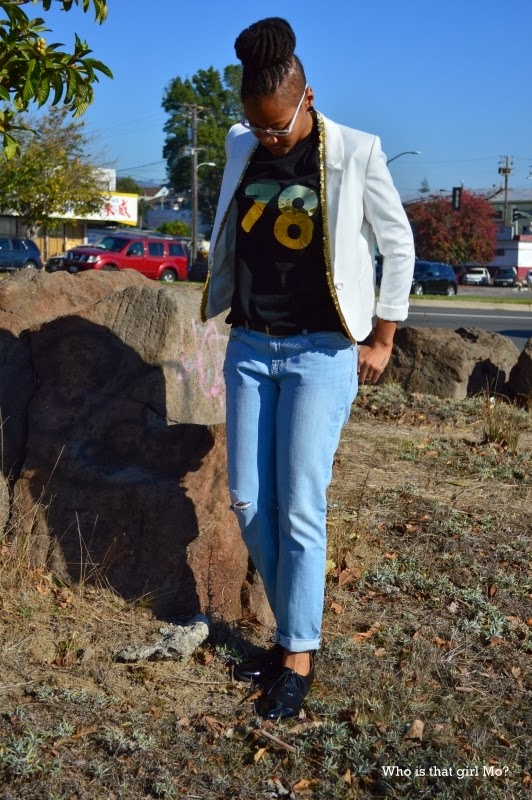
This month's DIY collaboration with Mckenzie from Why buy it DIY it is sequins. I chose sequins for December's project because sparkly and shiny pieces are usually worn for the fall/winter holiday season. I made a sequin trim blazer and this is an easy way for me to look festive without actually dressing up. I also made the gold foil number tee that I'm wearing. I'm so happy because I finally have a number tee in my birth year! 
Supplies:
blazer
about 2 yards of stretchy sequin trim depending on blazer measurements
fabric glue
pins
chalk/marking pen
fray stop
scissors
  • Measure around the lapels and collar of the blazer.
  • Mark the wrong side of the trim and blazer with the chalk and/or marking pen by adding dots to make sure that it will be evenly placed when glued. 
  • Pin the trim about 1/4 inch to the inside of the blazer lining up the dots.
  • Apply fabric glue to the blazer and press down onto the trim. I did this in sections
  • Let dry.
  • Cut off excess trim and apply fray stop to the ends.


What do you think about wearing sequins for the fall/winter holiday season? 
Make sure to check out Mckenzie's sequin sweatsuit!

Outfit Details:
jeans JBrand | tee Walmart | blazer H&M | oxfords Seychelles | bag Steve Madden


DIY: Bowties

    | 12 comments

Being that this is a holiday week, this week's DIY project is quick, fun and easy. Bowties! This took about 20 mins and I made 2. One in quilted leather and one in denim, both from my scraps stash. 
Supplies:
1/4 yard of fabric or any scraps or old articles of clothing
chalk
glue gun
pin back

  • Cut out a 6 inch by 3 1/2 inch piece of fabric.
  • Draw a vertical line and horizontal line on the wrong side of the fabric.
  • Place a drop of glue on the right side of the fabric where the lines intersect in the middle.
  • Fold in half lengthwise and press close.
  • Place a drop of glue close to the edge on the vertical line and fold the fabric back. Press down.
  • Continue this on both sides creating an accordion effect.
  • Cut out a 3/4 inch by 2 1/2 inch strip.
  • With the bowtie facing down, place a drop of glue onto the edge of the strip and press down onto the center of the bowtie.
  • Wrap the strip around the center and apply a drop of glue to seal it closed.


denim shirt H&M | stripe cardigan Thrifted | plaid shirt Target

You can easily make this yourself!

DIY: More Leather Pockets

    | 35 comments
The third project in my leather accent series is pockets again. Bigger pockets. I used my oversized cardigan and switched out the pockets. I think Fall is officially here in the Bay Area. The weather was overcast yesterday so I added a scarf to my look. I really only like the Fall season for the layering and styles you can wear. Other than that I. Don't. Like. To. Be. Cold. Seriously. One would think that the Bay Area weather should be a piece of cake compared to the East Coast, where I'm originally from, but cold is cold is cold. Yet, I'm excited that I can pull out the pieces I've been waiting to wear. I've yet to create my fall uniform but cardigans and boots may be my go to for the weekends.
Supplies:
cardigan
leather fabric
seam ripper
chalk
clips
sewing machine
  • Remove the original pockets from the cardigan with the seam ripper.
  • Use the original pocket and place on the leather fabric.
  • Trace with the chalk onto the leather.
  • Cut out the leather leaving room for seam allowance.
  • Fold down the seams about 1/4 inch and use the clips the hold in place.
  • Place the pockets onto same area as original pockets.
  • Topstitch the leather pockets onto the cardigan using a loose and longer stitch. 


Do you have your fall uniform ready? What piece/pieces will you be wearing repeatedly?


Outfit Details:
cardigan Forever21 & DIY | crop top Thrifted | leggings H&M | scarf Gifted from India | boots Nine West


Plaid and Leather

    | 31 comments

This week's Style Me Friday inspiration is plaid. I wore plaid  here on Sunday and kept it casual. I also wore plaid with a blazer I made and style it with a grunge look. Today I decided to continue with the plaid and leather look.


Have a great weekend and make sure to check out the other ladies plaid looks!

Outfit Details:
shirt Thrifted | vest H&M | jeans Ross | shoes Nine West

DIY: Cut Out Shoulder Shirt

    | 23 comments


I bought this shirt about a month ago on sale and assumed that the medium will fit me fine. I keep forgetting that I have broad shoulders so not all mediums will fit me like I want it to. Sometimes I end up with the shirt buttons fighting to stay in place and that is a no go for me. Some large shirts fit me fine but there are some that are too loose in the side and waist area which isn't always a good thing. I really liked that the shirt is sheer and it's in my favorite color so I couldn't justify giving it up. I decided to create a cut out shoulder look that way my boobs and my shoulders will have a little bit more breathing room. Sorry, I forgot to take a few pics of some steps.
Supplies:
shirt
chalk
pins
round object
scissors
heat bond or needle & thread or sewing machine
  • Put the shirt on and mark where you want it to start and where you want it to end. You can use chalk or pins.
  • Fold the shirt completely in half making sure the shoulder seams are lined up. This is to make sure each will be evenly cut.
  • Take a round object like a small plate and place it between your markings. Trace around the plate and connect the points. 
  • Cut along the trace line. The cut out piece should be in a shape of a oval.
  • Fold the cut edge down about a 1/4 inch and either hand sew or machine stitch a seam. You can also use heat bond for a no sew project.


I styled it with a pair of faded black mid rise skinny jeans and black suede ankle boots and wore it Saturday night as Mel and I celebrated our 5th anniversary. Time sure does fly when you're having fun! :-)
Today is our actual anniversary and I created and printed a pair of  tickets as one of Mel's gifts. We will be locked in our room tonight after work enjoying a couple of good movies with some pizza and popcorn. 

Outfit Details:
button up American Eagle | jeans American Eagle | boots Dolce Vita | necklace Forever21 | bag H&M