Showing posts with label thrifted. Show all posts

DIY: Lace Back Tunic

    | 19 comments
DIY lace back tunic pose 1 {who is that girl Mo?}
For this week's DIY project I decided to go through my stash and sew something from scratch. I haven't sewn anything from a pattern since I got my first sewing machine about 4 years ago. I feel like I'm horrible at pattern sewing and better at refashioning items. I always have trouble getting the sizing right but we all know that practice makes perfect and my goal is to sew something from scratch at least once a month. The first piece is a lace back tunic and I used a pattern fabric and black lace as the contrast for the top back. The fabric has been in my stash since I bought last summer when I attended the MimiGStyle conference. I used version C from the pattern. 
Supplies:
fabric 
pattern McCalls M6359
bias tape
pins
scissors
sewing machine
DIY lace back tunic tutorial pics {who is that girl Mo?}
DIY lace back tunic front and back view {who is that girl Mo?}
DIY lace back tunic pose 2 {who is that girl Mo?}

DIY lace back tunic pose 3 {who is that girl Mo?}

DIY lace back tunic pose 4 {who is that girl Mo?}

DIY lace back tunic pose 5 {who is that girl Mo?}

Outfit Details:
boots Crown Vintage | thrifted pants J Crew | hat H&M
Linking up with: THE STYLE RECORD | WHITNEY NIC JAMES | MONDAY MINGLE | Monday Bloom FUNDAY MONDAY | Mix It MondaysDO TELL TUESDAY

DIY: Graphic Tee

    | 47 comments
DIY graphic tee pose 1 {who is that girl mo?}
This week's DIY project is simple and fun. I decided to keep it easy so I can wear a casual look.
Supplies:
t-shirt
fabric paint
bowl
painter's tape
foam brush
cardboard or magazines
  • After coming up with a design, Apply the painter's tape to the shirt on the areas that you don't want painted.
  • Place the cardboard or magazine in between the shirt so the paint will not bleed through.
  • Pour paint into bowl.
  • Begin applying the paint in the desired areas.
  • Let dry overnight.
  • Carefully remove painter's tape from shirt.
DIY graphic tee tutorial pics {who is that girl mo?}
DIY graphic tee pose 2 {who is that girl mo?}

military jacket skinny jeans combat boots {who is that girl mo?}

DIY graphic tee pose 3 {who is that girl mo?}

DIY graphic tee pose 4 {who is that girl mo?}


Are you into graphic tees?

Outfit Details:
thrifted jeans BDG | boots MIA | jacket Old Navy

Linking up with: The Style Record |  Monday Mingle | Funday Monday
 Monday Bloom | Mix it Mondays | Do Tell Tuesdays | All Things Pretty

DIY: Shirtdress

    | 28 comments

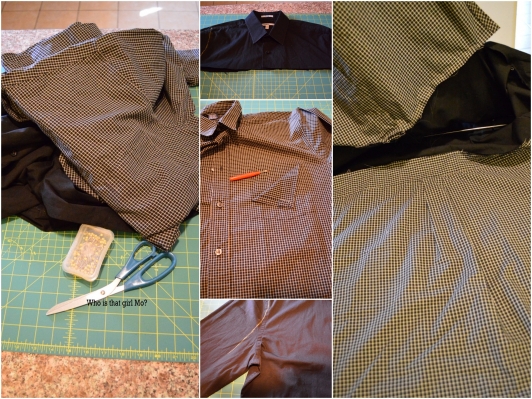
I'm back with another DIY and this week I made a shirt dress from 2 men's button up shirts. By using two shirts I was able to make the dress color blocked. It's best to use shirts that are much larger than you. I used a large for the top half and an extra large for the bottom half. I ended up not having enough for the dress to wrap completely around me, so I used leftover scraps and created side panels. Next time I will use a 2xl button up.


I'm not really big on dresses but I like this style and it was cool to make. Are you big on dresses?


Linking up with: Whitney Nic James | The Style Record | Monday Bloom | Monday Mingle  
Funday Monday | Two Birds | A La Mode Monday | Do Tell Tuesday | Style Elixir
All Things Pretty

Classics

    | 29 comments


Today I decided to style my outfit using classic colors and pieces. Blazer, check! white tee, check! Black pants, check! Sneakers, check! Not everyone may consider a pair of sneakers as a classic piece to have in your wardrobe, but I do! What classic pieces do you have in your closet?

Outfit Details:
thrifted blazer Talbots | tee Target | pants Target | 
sneakers New Balance | necklace Forever21 | watch Target

Linking up with: Style Elixir | Mamanista Fridays | That Friday Blog Hop

DIY: Tie Dye Jeans

    | 29 comments

This week's DIY project is Tie Dye Jeans. I know tie dye articles of clothing are usually worn in summer months but who cares about the rules. Besides, I'm in Cali which mean there are usually more warm days than not. At least during the day. For those of you who may recall my acid wash jeans project, it may seem like it's similar to this project but I promise the results are different. I'm going to do this project again with colored dye using my white jeans to wear during the upcoming Spring months.
Supplies:
jeans
rubber bands
bleach
bucket
gloves
 
  • Soak the jeans in cold water and ring out.
  • Tie the rubber bands around the jeans in bunches until it is tied into a ball. There is no right or wrong way to do this. The areas with the bands is where the darker patches will be.
  • Mix 1 part bleach and 2 parts water in the bucket. With gloves, place the jeans into the bucket.
  • Let sit for a few hours or so and keep checking until desired results are achieved. I let mine sit for 3 hours. More time = more white/lighter patches.
  • Remove the jeans with the gloves and rinse in sink or tub with cold water.
  • Air dry. I let mine dry overnight.
  • Machine wash alone with soap and then machine dry.


What do you think about tie dye jeans? What color dyes should I use for my Spring pair?
 
Outfit Details:
thrifted jeans H&M | blazer H&M | shirt Target | thrifted men's boots


Linking up with: Funday Monday | Monday Mingle | The Style Record | Two Birds 
Do Tell Tuesday | All Things Pretty | Treat Yo Self

DIY: Blinging Beanie

    | 24 comments

Supplies:
beanie
buttons with bling
needle and thread or medium safety pins


  • Decide where you want to place the buttons. You can use 1, 2 or more buttons.
  • Hand stitch into place with needle and thread or secure buttons with safety pins if you want it to be interchangeable between different color beanies. (As you can see, I switched the buttons to my red beanie.)


Outfit Details:
thrifted turtleneck H&M | men's cardigan Target | DIY acid washed jeans | boots Dolce Vita | beanie Target


Linking up with: Monday Mingle | The Style Record | Monday Funday | Monday Bloom  | Two Birds

DIY: Bowties

    | 12 comments

Being that this is a holiday week, this week's DIY project is quick, fun and easy. Bowties! This took about 20 mins and I made 2. One in quilted leather and one in denim, both from my scraps stash. 
Supplies:
1/4 yard of fabric or any scraps or old articles of clothing
chalk
glue gun
pin back

  • Cut out a 6 inch by 3 1/2 inch piece of fabric.
  • Draw a vertical line and horizontal line on the wrong side of the fabric.
  • Place a drop of glue on the right side of the fabric where the lines intersect in the middle.
  • Fold in half lengthwise and press close.
  • Place a drop of glue close to the edge on the vertical line and fold the fabric back. Press down.
  • Continue this on both sides creating an accordion effect.
  • Cut out a 3/4 inch by 2 1/2 inch strip.
  • With the bowtie facing down, place a drop of glue onto the edge of the strip and press down onto the center of the bowtie.
  • Wrap the strip around the center and apply a drop of glue to seal it closed.


denim shirt H&M | stripe cardigan Thrifted | plaid shirt Target

You can easily make this yourself!

Blackout

    | 36 comments
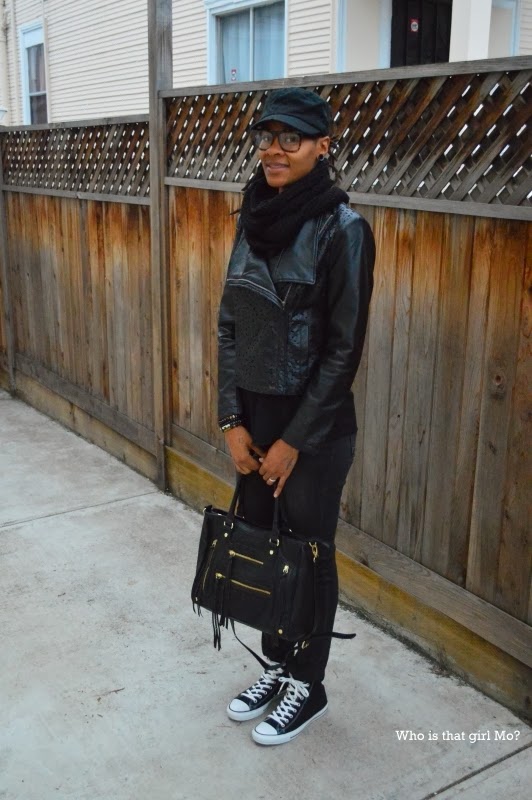
This week's Style Me Friday inspiration is all black everything which sounds pretty easy but adding different textures and shades to a monochrome black look can help make it stand out a little more. I kept my look simple and cozy and styled it with my new bag. I've had it for about 2 weeks now and I'm getting quite used to it but I did feel like a fraud in the beginning. I guess Mo is a grown woman now! :-)


Make sure to check out how the other ladies styled their all black looks!

Outfit Details:
faux leather jacket Burlington Coat Factory | jeans American Eagle | sneakers Converse | tank Thrifted 
 hat Berkeley Hat Co | scarf Handmade | bag Steve Madden


DIY: More Leather Pockets

    | 35 comments
The third project in my leather accent series is pockets again. Bigger pockets. I used my oversized cardigan and switched out the pockets. I think Fall is officially here in the Bay Area. The weather was overcast yesterday so I added a scarf to my look. I really only like the Fall season for the layering and styles you can wear. Other than that I. Don't. Like. To. Be. Cold. Seriously. One would think that the Bay Area weather should be a piece of cake compared to the East Coast, where I'm originally from, but cold is cold is cold. Yet, I'm excited that I can pull out the pieces I've been waiting to wear. I've yet to create my fall uniform but cardigans and boots may be my go to for the weekends.
Supplies:
cardigan
leather fabric
seam ripper
chalk
clips
sewing machine
  • Remove the original pockets from the cardigan with the seam ripper.
  • Use the original pocket and place on the leather fabric.
  • Trace with the chalk onto the leather.
  • Cut out the leather leaving room for seam allowance.
  • Fold down the seams about 1/4 inch and use the clips the hold in place.
  • Place the pockets onto same area as original pockets.
  • Topstitch the leather pockets onto the cardigan using a loose and longer stitch. 


Do you have your fall uniform ready? What piece/pieces will you be wearing repeatedly?


Outfit Details:
cardigan Forever21 & DIY | crop top Thrifted | leggings H&M | scarf Gifted from India | boots Nine West


Plaid and Leather

    | 31 comments

This week's Style Me Friday inspiration is plaid. I wore plaid  here on Sunday and kept it casual. I also wore plaid with a blazer I made and style it with a grunge look. Today I decided to continue with the plaid and leather look.


Have a great weekend and make sure to check out the other ladies plaid looks!

Outfit Details:
shirt Thrifted | vest H&M | jeans Ross | shoes Nine West