Showing posts with label onthego. Show all posts

DIY: Mixed print/pattern shirt

    | 16 comments

For my latest DIY project I decided to refashion my acid wash button up by making it a mixed print shirt and what better print to use than plaid. Plaid is still trending heavily right now so this was a no-brainer but I decided to use a different type of plaid versus the tartan and red/black that we're seeing now. This was my weekend wear look to run some errands and have a chill day.

Supplies:
printed button of your choice
shirt, fabric or bandana of your choice
scissors
seam ripper
pins
chalk
sewing machine

  • Remove the pockets from the button up shirt.
  • Cut out the back panel of the shirt along the seams.
  • Take the piece that you cut and place on top of the plaid shirt or fabric. Pin, trace and cut with a 1 inch SA.
  • Pin the new plaid back panel onto the the edges of the chambray shirt right side to right side and sew over the seams.
  • Since I used a plaid shirt the shirt tail was already hemmed. If you use fabric, sew a hem on the tail of the shirt.
  • Take the denim pocket and pin onto the plaid. Trace with chalk and cut. Iron down the seams to lay flat.
  • Sew a straight stitch about 2 inches down from the top of the pocket.
  • Pin the pocket onto the pocket area and sew onto the shirt. I only used one pocket because I like the way the pocket area looks once removed.


    Outfit Details:
    jeans Seven for all Mankind | tee Target | sneakers Converse | beanie Forever21 | Necklace Forever21


    Blackout

        | 36 comments
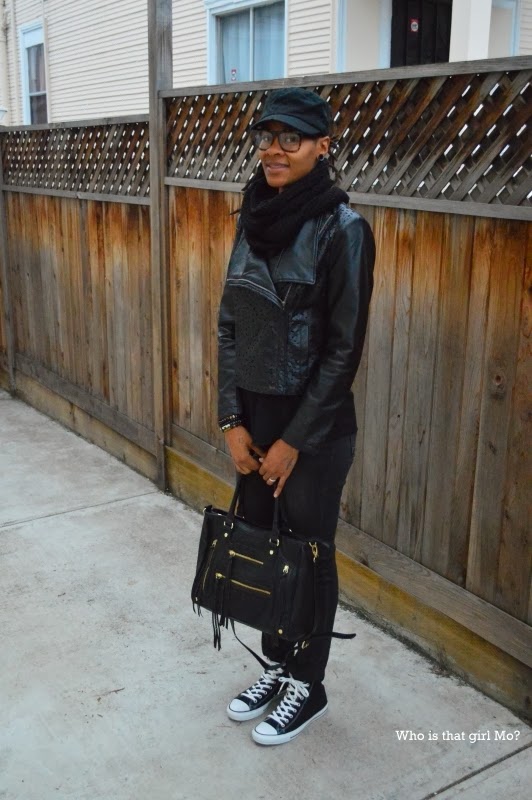
    This week's Style Me Friday inspiration is all black everything which sounds pretty easy but adding different textures and shades to a monochrome black look can help make it stand out a little more. I kept my look simple and cozy and styled it with my new bag. I've had it for about 2 weeks now and I'm getting quite used to it but I did feel like a fraud in the beginning. I guess Mo is a grown woman now! :-)


    Make sure to check out how the other ladies styled their all black looks!

    Outfit Details:
    faux leather jacket Burlington Coat Factory | jeans American Eagle | sneakers Converse | tank Thrifted 
     hat Berkeley Hat Co | scarf Handmade | bag Steve Madden


    DIY: Varsity Blues

        | 40 comments

    It's that time of the month again!! Mckenzie and I have teamed up to bring you guys another monthly DIY collaboration and this month's project is based on varsity sweaters. This one was super easy and fun. I styled my cardigan with a button up and oxfords to give it a somewhat preppy look.
    Supplies:
    cardigan
    scissors
    felt in 1 - 2 colors of your choice
    ribbon in your choice of width
    chalk or marking pen
    fabric glue
    printout of letter
    • With the cardigan on, measure around the upper area of your arm near the underarm area. mark where you want to place the ribbon with chalk.
    • Cut 2 or 3 strips of ribbon using this measurement and add about 1/2 inch.
    • Apply the fabric glue to the ribbon and glue onto the marked areas on the sleeve. Place something in between the sleeves such as a piece of cardboard of magazine. This is so the front and back sides of the sleeves won't stick together. Let dry.
    • Print out a letter of your choice using a large font. I used a font size of 400. Cut out the letter.
    • Place the letter onto the felt and trace around the edge with the chalk or marking pen. Cut out the felt letter.
    • Take the felt letter and place it on top of a new piece of felt. Trace around the edges about 1/2 inch. This will be the border. You can also print out the same letter in a bigger size and trace that as the border. Cut out.
    • Glue the letter onto the border with the fabric glue. Let dry.
    • Glue the letter and border onto the desired area of the cardigan. Let dry.
    • With the cardigan on, mark above and below your elbow with the chalk.
    • Using a round object such as a measuring cup, trace half circles at the top and bottom of the felt for your patches.
    • Connect the lines on the sides creating ovals. Cut out.
    • Apply glue to the elbow patch and press onto marked areas on the sleeves. Make sure something is placed in between.


    Do you have any varsity sweaters or jackets in your closet? Will you be making one?
    Don't forget to check out Mckenzie's DIY!

    Outfit Details:
    cardigan Target & DIY | button up Target | jeans Gap | oxfords Cole Haan


    Camo

        | 35 comments
     
    It's the first of the month! Can you guys believe it's November already? The holiday season has officially begun and with that comes colder days. Luckily, the temperature here is still decent (it can't seem to make up it's mind.) and I can still wear tanks and tees without scarves on some days. 

    On Wednesday, Mel and I had date night and we went to a Jamaican restaurant for dinner. The food was bomb and I ate almost everything on my plate plus had a few bites of carrot pie. I know, I'm greedy but it made me so happy. :-)


    I styled my look with my camo pants, and white tee, and a neutral cardigan. Camo is a cool trend that will always be around and when the weather does get a bit colder, I can style the pants with a graphic sweatshirt and some moto or combat boots

    Have a great weekend!!

    Outfit Details:
    pants Urban Outfitters | tee Forever21 | cardigan Old Navy | boots Dolce Vita | watch Target

    Linking up with: Style Elixir | Simple Easy Style 

    DIY: Leather Hoodie

        | 38 comments

    The last (for now) project for the leather accents series is a leather hoodie. The temperature has been cooler and hoodies and sweatshirts are one of my main outerwear pieces to grab and go. I added leather shoulder panels and a leather pocket which gave it a trendy look. I kept my outfit simple and styled it with straight leg jeans and chucks. Perfect for a chill and relaxing day. 

    Supplies:
    leather fabric
    hoodie
    chalk
    pins
    fabric glue
    seam gauge or ruler
    sewing machine

    • With the hoodie on, mark with the chalk where you would like to place the leather.
    • Use the sewing gauge or ruler to get the exact measurements. Cut out pieces in desired shapes.
    • Apply fabric glue to the seams and fold/press down. Let dry for a couple of hours.
    • Apply fabric glue to the wrong side of the leather accents and press onto desired area. Let dry.
    • Optional: Topstitch the accents.


        What is one of your grab and go outerwear piece for cooler days?

        Outfit Details:
        hoodie Converse & DIY | jeans AG | sneakers Converse | beanie Forever21 | watch Mel's


        DIY: More Leather Pockets

            | 35 comments
        The third project in my leather accent series is pockets again. Bigger pockets. I used my oversized cardigan and switched out the pockets. I think Fall is officially here in the Bay Area. The weather was overcast yesterday so I added a scarf to my look. I really only like the Fall season for the layering and styles you can wear. Other than that I. Don't. Like. To. Be. Cold. Seriously. One would think that the Bay Area weather should be a piece of cake compared to the East Coast, where I'm originally from, but cold is cold is cold. Yet, I'm excited that I can pull out the pieces I've been waiting to wear. I've yet to create my fall uniform but cardigans and boots may be my go to for the weekends.
        Supplies:
        cardigan
        leather fabric
        seam ripper
        chalk
        clips
        sewing machine
        • Remove the original pockets from the cardigan with the seam ripper.
        • Use the original pocket and place on the leather fabric.
        • Trace with the chalk onto the leather.
        • Cut out the leather leaving room for seam allowance.
        • Fold down the seams about 1/4 inch and use the clips the hold in place.
        • Place the pockets onto same area as original pockets.
        • Topstitch the leather pockets onto the cardigan using a loose and longer stitch. 


        Do you have your fall uniform ready? What piece/pieces will you be wearing repeatedly?


        Outfit Details:
        cardigan Forever21 & DIY | crop top Thrifted | leggings H&M | scarf Gifted from India | boots Nine West


        Plaid and Leather

            | 31 comments

        This week's Style Me Friday inspiration is plaid. I wore plaid  here on Sunday and kept it casual. I also wore plaid with a blazer I made and style it with a grunge look. Today I decided to continue with the plaid and leather look.


        Have a great weekend and make sure to check out the other ladies plaid looks!

        Outfit Details:
        shirt Thrifted | vest H&M | jeans Ross | shoes Nine West

        DIY: Cut Out Shoulder Shirt

            | 23 comments


        I bought this shirt about a month ago on sale and assumed that the medium will fit me fine. I keep forgetting that I have broad shoulders so not all mediums will fit me like I want it to. Sometimes I end up with the shirt buttons fighting to stay in place and that is a no go for me. Some large shirts fit me fine but there are some that are too loose in the side and waist area which isn't always a good thing. I really liked that the shirt is sheer and it's in my favorite color so I couldn't justify giving it up. I decided to create a cut out shoulder look that way my boobs and my shoulders will have a little bit more breathing room. Sorry, I forgot to take a few pics of some steps.
        Supplies:
        shirt
        chalk
        pins
        round object
        scissors
        heat bond or needle & thread or sewing machine
        • Put the shirt on and mark where you want it to start and where you want it to end. You can use chalk or pins.
        • Fold the shirt completely in half making sure the shoulder seams are lined up. This is to make sure each will be evenly cut.
        • Take a round object like a small plate and place it between your markings. Trace around the plate and connect the points. 
        • Cut along the trace line. The cut out piece should be in a shape of a oval.
        • Fold the cut edge down about a 1/4 inch and either hand sew or machine stitch a seam. You can also use heat bond for a no sew project.


        I styled it with a pair of faded black mid rise skinny jeans and black suede ankle boots and wore it Saturday night as Mel and I celebrated our 5th anniversary. Time sure does fly when you're having fun! :-)
        Today is our actual anniversary and I created and printed a pair of  tickets as one of Mel's gifts. We will be locked in our room tonight after work enjoying a couple of good movies with some pizza and popcorn. 

        Outfit Details:
        button up American Eagle | jeans American Eagle | boots Dolce Vita | necklace Forever21 | bag H&M

        Number 82

            | 12 comments


        Happy Weekend I've been searching for the perfect number tee for a while now and I found it a few weeks ago at Forever21. This number tee has a loose boxy fit and cuffed sleeves which is perfect for my tomboy style and it would have been awesome if I was able to find number 78, the year of my birth, but I didn't. I did spot a number 79 tee but I didn't really like the look of it and I could have easily just made my own tee with some iron-on numbers or number stencils and paint but this was something I wanted store bought. I kept my look simple by styling the tee with a pair of black ankle pants, which I cuffed and one of my favorite black oxfords. Simple, easy, and on trend with the black and white. 
        Do you have a number tee? How do you style it?

        Outfit Details:
        tee Forever21 | pants H&M | oxfords Seychelles

        Linking up with: Simple Easy Style | Style Elixir

        Sporty Cool

            | 11 comments

        I bought this denim skirt from JCP a few years back and was going to toss it because frankly Mel never liked it and still don't. I probably didn't either since there wasn't any hesitation to throw it into my toss away pile. Lately I've been pulling pieces back from the pile and giving them fresh makeovers. For this skirt, I figured that a knee length style would look better and I'll like it a lot more than I originally thought. I can style it with riding boots when the temperature drops and with a pair of high top chucks when it gets hot again. Let's face it, I can wear it with anything just because it's denim. As you can see, the skirt had a split in the front, so I added a leftover piece from the scraps and sewed it using the mustard/gold colored denim thread. I left the edges raw. Fresh and easy! I styled it with a cropped sweater that I made, floral cap and a pair of ankle boots for a sporty Fall look. 


        Have a great weekend!!


        Outfit Details:
        sweater Old Navy & DIY | skirt Bisou Bisou & DIY |  boots Target | cap Urban Outfitters