Showing posts with label Converse. Show all posts

More Layers

    | 14 comments

Yay to Friday ya'll!! I decided to do another layered look but went more casual by ditching the sweater for a graphic t-shirt and wearing a good ole pair of chucks.


Have a great weekend ladies!!

Outfit Details:
men's button up Old Navy | t-shirt DIY | jeans American Eagle | sneakers Converse | bag Steve Madden 

Linking up with: Style Elixir | That Friday Blog Hop | Mamanista Fridays


Blog A Lot

    | 45 comments


Tomorrow is my 1 year blogiversary!! Man, how time flies. I want to dedicate this post to everyone who takes the time to visit my blog, read my posts, leave me a much appreciated comment, and for everyone who motivates me to want to continue blogging for a very long time. Today marks post number 175! That's quite a bit of blogging and style posts and it's safe to say that I blog A LOT. My style has changed and evolved tremendously over this past year and I've learned that it's easier and cheaper to just stick to being yourself. :-) Oh yeah, How cool is this tee!?!
Thanks so much guys!!!!

Outfit Details:
jacket H&M | thrifted jeans JCrew | sneakers Converse | button up Target | tee Raygun

Linking up with: Simple Easy Style | Style Elixir

DIY: Mixed print/pattern shirt

    | 16 comments

For my latest DIY project I decided to refashion my acid wash button up by making it a mixed print shirt and what better print to use than plaid. Plaid is still trending heavily right now so this was a no-brainer but I decided to use a different type of plaid versus the tartan and red/black that we're seeing now. This was my weekend wear look to run some errands and have a chill day.

Supplies:
printed button of your choice
shirt, fabric or bandana of your choice
scissors
seam ripper
pins
chalk
sewing machine

  • Remove the pockets from the button up shirt.
  • Cut out the back panel of the shirt along the seams.
  • Take the piece that you cut and place on top of the plaid shirt or fabric. Pin, trace and cut with a 1 inch SA.
  • Pin the new plaid back panel onto the the edges of the chambray shirt right side to right side and sew over the seams.
  • Since I used a plaid shirt the shirt tail was already hemmed. If you use fabric, sew a hem on the tail of the shirt.
  • Take the denim pocket and pin onto the plaid. Trace with chalk and cut. Iron down the seams to lay flat.
  • Sew a straight stitch about 2 inches down from the top of the pocket.
  • Pin the pocket onto the pocket area and sew onto the shirt. I only used one pocket because I like the way the pocket area looks once removed.


    Outfit Details:
    jeans Seven for all Mankind | tee Target | sneakers Converse | beanie Forever21 | Necklace Forever21


    Blackout

        | 36 comments
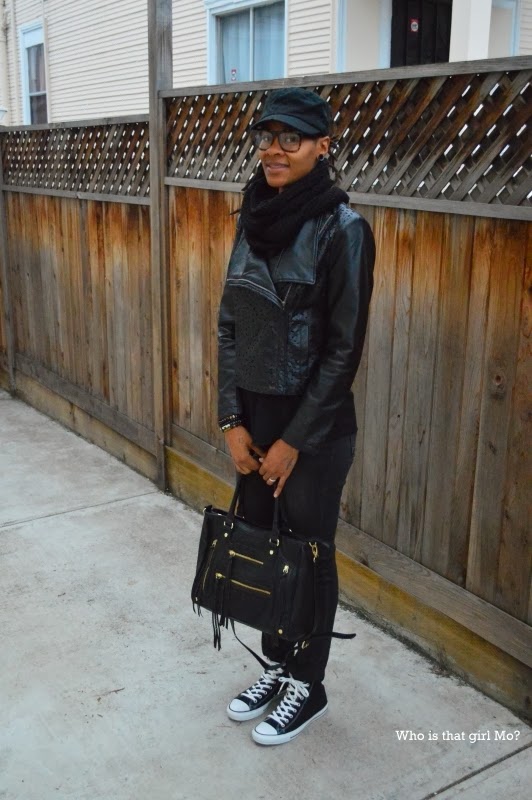
    This week's Style Me Friday inspiration is all black everything which sounds pretty easy but adding different textures and shades to a monochrome black look can help make it stand out a little more. I kept my look simple and cozy and styled it with my new bag. I've had it for about 2 weeks now and I'm getting quite used to it but I did feel like a fraud in the beginning. I guess Mo is a grown woman now! :-)


    Make sure to check out how the other ladies styled their all black looks!

    Outfit Details:
    faux leather jacket Burlington Coat Factory | jeans American Eagle | sneakers Converse | tank Thrifted 
     hat Berkeley Hat Co | scarf Handmade | bag Steve Madden


    DIY: Leather Hoodie

        | 38 comments

    The last (for now) project for the leather accents series is a leather hoodie. The temperature has been cooler and hoodies and sweatshirts are one of my main outerwear pieces to grab and go. I added leather shoulder panels and a leather pocket which gave it a trendy look. I kept my outfit simple and styled it with straight leg jeans and chucks. Perfect for a chill and relaxing day. 

    Supplies:
    leather fabric
    hoodie
    chalk
    pins
    fabric glue
    seam gauge or ruler
    sewing machine

    • With the hoodie on, mark with the chalk where you would like to place the leather.
    • Use the sewing gauge or ruler to get the exact measurements. Cut out pieces in desired shapes.
    • Apply fabric glue to the seams and fold/press down. Let dry for a couple of hours.
    • Apply fabric glue to the wrong side of the leather accents and press onto desired area. Let dry.
    • Optional: Topstitch the accents.


        What is one of your grab and go outerwear piece for cooler days?

        Outfit Details:
        hoodie Converse & DIY | jeans AG | sneakers Converse | beanie Forever21 | watch Mel's


        DIY: Leather Pocket

            | 40 comments

        First up on the leather accents DIY project list is the leather pocket. I thought I'd start off easy. Both leather and plaid are currently big trends so I thought it would be cool to combine them together. 
        Supplies:
        Shirt
        faux leather fabric
        scissors
        seam ripper
        clips
        sewing gauge
        chalk
        pattern paper or wax free paper if you don't have a teflon, walking or glide sewing foot.
        sewing machine (denim needle)
        • Remove the original pocket from the shirt using the seam ripper.
        • Iron flat the original pocket and place on top of leather fabric. Pin or clip in place. (Pins may leave holes so hair clips, bobby pins or paper clips will work)
        • Using the chalk trace around the pocket onto the leather piece. Cut along the marked line.
        • Use the sewing gauge to measure the seams you will create when you fold down around the pocket. Use the clips to hold in place.
        • Adjust the thread tension looser to about a 4 and adjust the stitch length longer to about a 3.
        • Place the pattern paper over the pocket and sew as you normally would. Sew the top part of the pocket. I originally marked my lines with the chalk but it was hard to see once the paper was added. I guess a trip to the craft store for a teflon foot is coming. The next leather projects should go smoother.
        • Remove the paper from the pocket. Gently scratch off any pieces that wasn't removed.
        • Place the pocket on the correct area of the shirt and clip paper on top. Sew the pocket onto the shirt. Remove the paper.


        What do you guys think about plaid and leather together?

        Outfit Details:
        shirt Old Navy Men's | jeans Levis | shoes Converse | watch Target

        DIY: Patchwork Denim

            | 21 comments


        Happy DIY Monday! Today I will be showing you how to make your own pair of patchwork jeans. This project is easy if you save the pieces that you cut to make your jeans into shorts. My motto is to ALWAYS save your scraps. You never know what or when you'll need it. I used the same pair of jeans from my DIY destroyed denim project since I knew I wouldn't be wearing it any longer. My top was a DIY long sleeved studded sweatshirt of which I shortened the sleeves to make it more summer appropriate and tightened the sides a couple of inches.
        Inspiration
        Supplies needed:
        pair of jeans
        scraps of dark and light denim 
        scissors
        fabric glue
        needle and thread
        Cut out different sizes of rectangular and square shapes from the denim scraps
        Place the shapes where you want on the jeans.
        Place cardboard between the legs of the jeans.
        Apply fabric glue to the back of the pieces and press down on jeans. Let dry.
        There is also the option to hand stitch the pieces onto your jeans using the needle and thread.


        What do you think about this week's project? 

        Outfit Details:
        Jeans - DIY
        Top - DIY Similar
        Shoes - Converse


        Fashion Star

            | 32 comments


        Last Thursday I had the opportunity to assist and  put together a couple of outfits for one of the designers at a  fashion show. The show started at 10:30 pm and I had to be on location at 8 pm with the models to help with whatever was needed. Of course I didn't leave the house until 8 but I made it into SF in about 18 mins. :-) This was fun event and it helped me to gain a little more experience with styling and working behind the scenes in the fashion field. It was pretty hectic backstage but overall I had a good time. I kept my look funky with some black faux leather shorts and some chucks. I had to make sure I was comfortable and prepared for all of the running around I had to do. I think I'm ready for the next one.
        Outfit Details:
        Blazer - H&M Similar
        Shorts - Target Similar
        Tank - Thrifted Cute
        Sneakers - Converse

        Linking up with: Style Elixir | Kiwi Womens Style | Transatlantic Blonde | Real Girl Glam | Because Shanna Said So | Fashion and Beauty Finds | Get Your Pretty On | Rolled Up Pretty | IFB

        Puma Party

            | 12 comments


        It's Wednesday! 2 more days until the weekend. Time to party! Are you ready? 
        This post is going to be quick since I have to get to work. My top is Puma brand and I thrifted it a few weeks ago for about $3. Score! Olive green, army green, whatever you call it,  is my number 1 favorite color in the world. It's a neutral in my opinion and goes with anything and I snatched it up when I went to the Gap outlet and they had a sale going on. Double score! All of that calls for a party right? 


        Outfit Details:
        Shirt - Puma Thrifted
        Pants - Gap Outlet Similar
        Sneakers - Converse
        Necklace - Forever21 Similar

        Linking up with: Get Your Pretty On | Transatlantic Blonde | Kiwi Women's Style | Style Elixir | Real Girl Glam | Because Shanna Said So | Rolled Up Pretty | Fashion and Beauty Finds

        DIY: Peplum Top

            | 5 comments


        It's Friday!! Time for some weekend fun. I'm going to a BBQ this evening with Mel and I'm also going to try to attend an event called Fashion Friday on the Plaza. It's a free happy hour shopping event with mobile fashion trucks and wine plus it includes a fashion show. It starts at 5 and ends at 9 and I hope I am able to make it before it ends. I may just go right after work and then head to the BBQ after. Either way I really want to go because this sounds a cool event. Who doesn't like shopping and wine at the same time?
        Now on to my outfit. This week's inspiration for Style Me Friday is peplum. Unfortunately, I don't own anything peplum. I kept trying to remind myself that I need to buy something peplum whether it's a skirt, top, or jacket but that obviously didn't work since I have yet to buy one. I really enjoy participating in Eboni's challenges so I try my hardest to make sure that it happens. Since I don't have anything peplum I decided to make one of my own. Believe me, I'm not naturally creative, I just wing it and hope for the best. I used a striped tee that Mel no longer wanted. The key to this project is to use a shirt or dress that is bigger than your normal size so you will have a piece wide enough for the peplum part of the top. 
        Before
        1. Mark  or pin on the shirt where you want the  peplum to go and add an inch. Cut across the shirt where marked. Saved the piece you cut off.
        2. Take a shirt that's more fitted and use as a guide to mark where you would take in.
        3. Sew along the marked lines using a tight straight stitch. Cut off the excess fabric and sew the edges using a serger or a zigzag stitch.
        4. Take the piece you cut and sew around it, about 1 inch away from the raw edge using a loose straight stitch. This is usually about a 4 on the stitch length dial. When finished leave the thread about 3 inches long before cutting. Gently pull the thread and the shirt will begin to gather creating a ruffled look. This will be your peplum.
        5. Take the peplum and loosen some of the gathering  by spreading it out. This is to make sure that it's the same width of the top and that it will fit your waist.
        6. Place the gathered edge of the peplum over the raw edge of the shirt right sides facing each other. Sew these two pieces together using a tight straight stitch about 1/4 inch away from the gathered edge. You can sew it twice to make sure the pieces will stay put.
        7. Try the shirt on and make any necessary adjustments. I had to take in the sides about an additional  2 inches because I wanted it to fit a bit tighter. I also shortened the sleeves.
        8. That's it. You're done! Now style your new top and take some photos. :-)


        How did I do? Do you own anything peplum?


        Outfit Details:
        Top - DIY Similar
        Jeans - Gap Similar
        Sneakers - Converse
        Beanie - Target