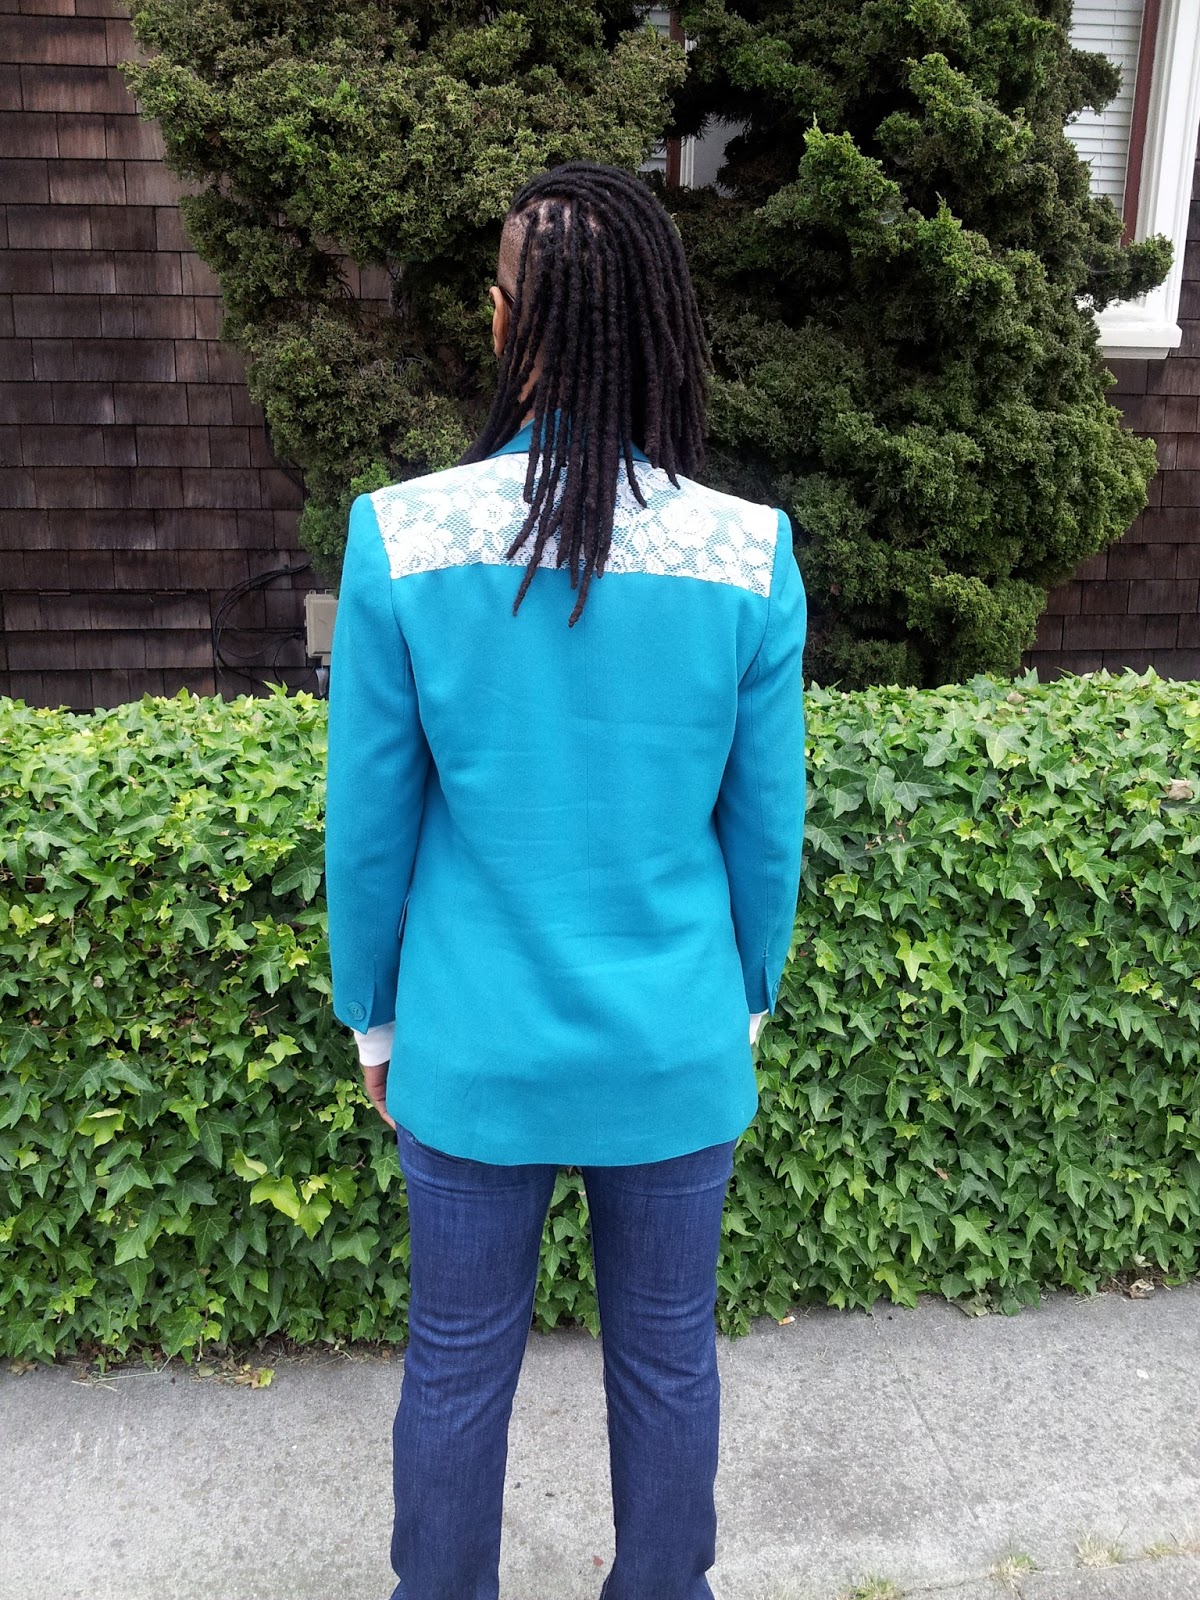
Sometimes it's easier and more convenient to buy pieces already made. Sometimes it's better when you add your own details and embellishments.Today I'm sharing with you guys a few DIYs that I've done this past weekend. The first is my turquoise blue blazer. I bought it when Goodwill had a 50% off sale. The blazer fit well but it had a small hole in the back. I really liked the color so I bought it knowing that I will come up with something to cover it up. What I came up with was lace. I used a lace curtain and cut it across the back of the blazer. I used fray stop to stop the ends from fraying and unraveling. I hand stitched the lace around the edges.


Next is another jacket I found at Goodwill. This jacket has many more holes but it gives it a worn in and edgy look. I added iron-on patches to the back of the jacket. I used gold stars and created a trail from top to bottom. I applied a music note patch on one of the sleeves. I also added stars to one of the front pockets as my armed forces insignia. I'm not sure what rank 3 stars are but I'm calling myself a captain. On the opposite pocket I made a patch with my last name. If you're not aware, I have a hyphenated last name and I used the second one. I got some alphabet stencils and used gold metallic paint. This was fun and easy.


Third is a army jacket that I was asked to help fix up last week. Keia was going on a trip to Miami and really wanted to bring the jacket. There were lots of rips all across the back and one huge hole at the bottom. At first, I wasn't sure if it could be repaired but I did some research and got some ideas. Mel also gave me a couple of suggestions. I glued black fabric on the inside of the jacket to cover up the holes. I then applied gold metallic paint around the edges of the holes to make it stand out. I also cut a few extra holes in round and crazy shapes to even it out a bit. I added a gold star patch to the outer edges of both front pockets and created 3 rows of gold studs across both shoulder areas. I thought I had more time than I did and because of that, took my time with the project. On Thursday after work around 6:30 pm, she texted me asking for the jacket and I wasn't done! She said it wasn't a big deal but I told her that I'd finish it for the evening. I really wanted to make sure she was able to take it with her on her trip. I wanted to add more to back of the jacket but it was fine as it was. I think it turned out great. I gave it to her around 9:30 pm that night. Keia said she liked what I had done and that she received many compliments. Cool!
 |
| Before |
 |
| After |
For the last DIYs, I sewed my own patterned pockets onto solid color v-neck tees. I measured the original pocket on the shirt and cut the fabric pieces out based on the measurements. I machine stitched around the edges of the fabric. Lastly, I applied fabric glue to the pocket and pressed onto the shirt. This was done to 3 different shirts. I was going to add a pocket to my cream sweatshirt but changed my mind at the last minute and instead applied it to one of the pockets on a pair of cut-offs.
And that's it! What do you think about my DIYs?
Outfit Details:
True Religion Jeans - Nordstrom Rack
Similar


you made these?? they are cute, especially the blue one.
ReplyDeleteI sure did. Thanks!
ReplyDeleteI love the blue blazer with the lace. Such a great idea to cover up a hole with a little DIY!
ReplyDeletexo, Yi-chia
Always Maylee
I love these fun DIY projects, I will have to try that laced back on a blazer.
ReplyDelete-Vogue&Heels
www.vogueandheels.com
Thank you Anngelik! Make sure you do. :-)
ReplyDeleteThanks and it was pretty easy. :-)
ReplyDeleteWow Mo, you did an amazing job!! You go girl, that army jacket looks like new!! I think you have found your calling, maybe designing your own clothes is in the future?:)
ReplyDeletewww.fashiondelights.net
Adding embellishments is such a great way to personalize apparel. You did an AMAZING job Mo!
ReplyDeleteI love this Mo! I have a large pile of stuff that needs tending! I need you to do a tutorial. You are talented!
ReplyDeletewww.theaccidentalmilitarywife.blogspot.com
Great post hun, especially the DIY project. The Army jacket was my favorite!
ReplyDeleteHope all is well! xx
Great DIY ideas!
ReplyDeleteThank you Christine. :-)
ReplyDeleteI tried to make a video but I'm just not good with the video stuff. I couldn't stop laughing. Thanks though. I tried to give steps with what I've done in this post. :-)
ReplyDeleteAll is well. Hope all is well with you. Thanks!
ReplyDeleteThank you!
ReplyDeleteI absolutely love that blazer with the lace. The color is beautiful and I'm a huge fan of lace.
ReplyDeleteTracy @ Sunny
Days and Starry Nights
Thanks Tracy. I didn't like lace before but now I'm beginning to. :-)
ReplyDeleteSuper cute DIYs!! Loving the embellishments you made to all the coats!
ReplyDeletexx
Giovanna
www.HeyLoveBlog.com
thank you. :-)
ReplyDeleteThat turquoise blazer is lovely!
ReplyDeleteThanks so much. :-)
ReplyDelete